How to photograph the Northern Lights
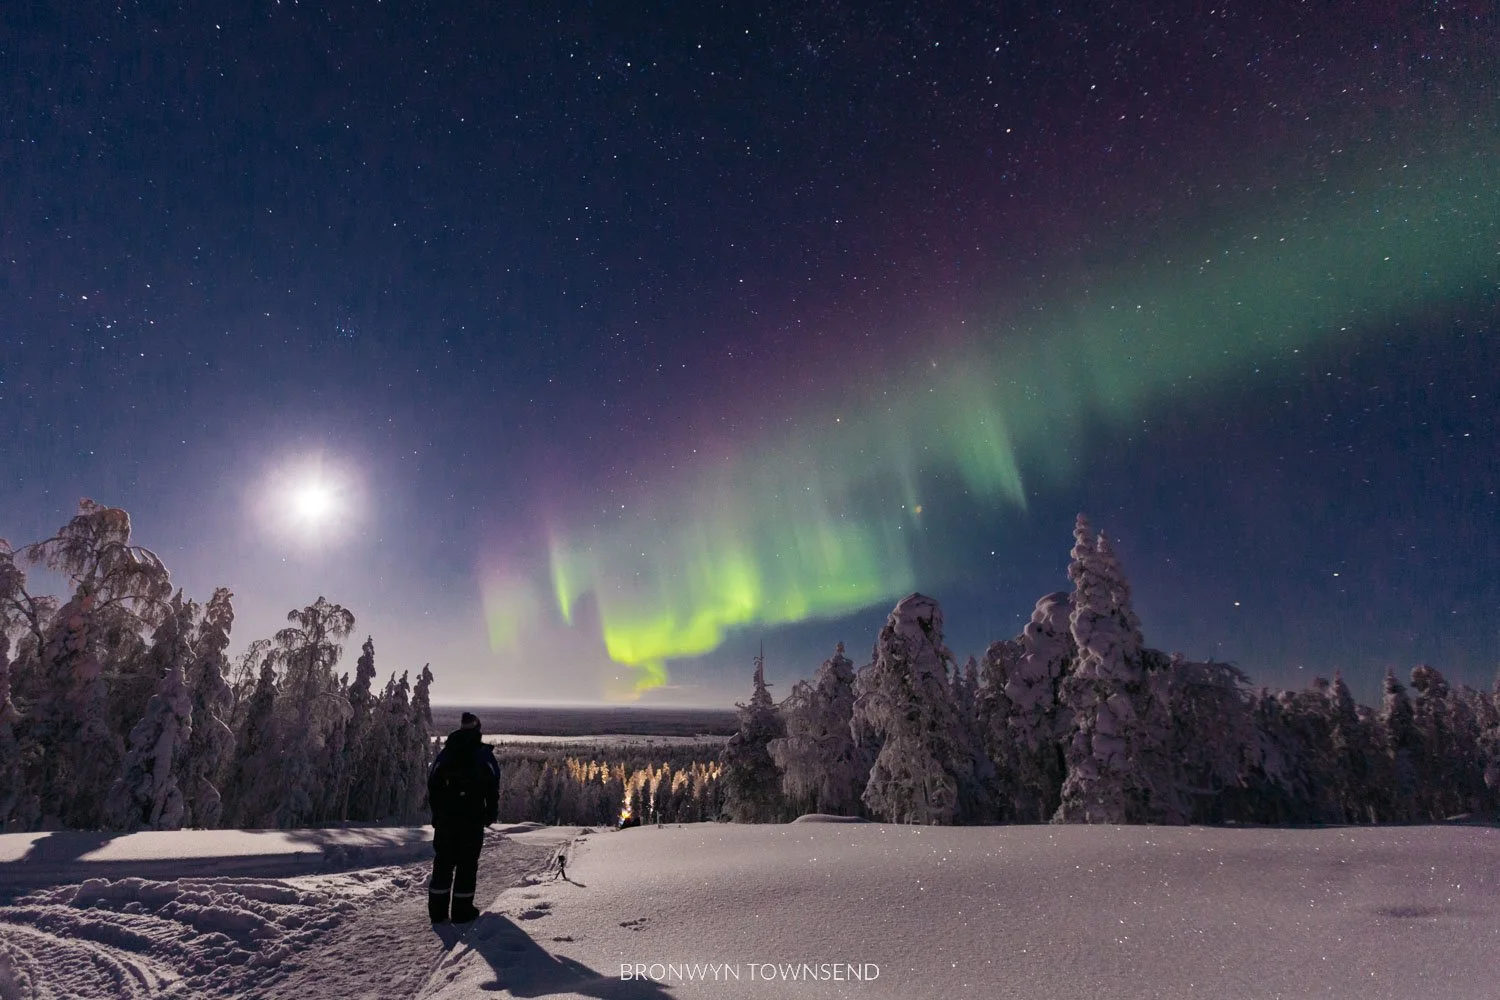
Ribbons of green dancing across the night sky feel like real-life magic. The aurora borealis is one of the most incredible phenomenons on earth and this spectacle of the north has become a bucket list experience for many. To ensure you can capture those memories with beautiful photos, this guide gives you the tools, settings, and insights into everything you need to know to photograph the northern lights.
This post may contain affiliate links.
If you choose to purchase I may receive a small commission at no additional cost to you. By using these links, you are supporting the ability for me to continue creating content for this site and its running costs.
I appreciate your support.
The first time I saw the northern lights was on our first night in Iceland. After a wholesome pasta dinner cooked in the hostel kitchen, we headed out from Reykjavik to escape the city lights in hopes of spotting some aurora activity. We had NO IDEA what we were looking for.
Turns out, when the lights aren’t super strong they can actually look more like wispy clouds to the uninitiated. We thought we MIGHT have seen them, so we pulled over in a car park. I set up the camera and tripod, and sure enough, a green light stretching across the night sky appeared on the screen.
Over the next week as we road-tripped our way across the southern half of Iceland, we perched up every night there were clear skies. Some nights we had better luck than others with low cloud cover and decent solar activity, others we waited for HOURS without sight of them. But patience is key to seeing and photographing the northern lights.
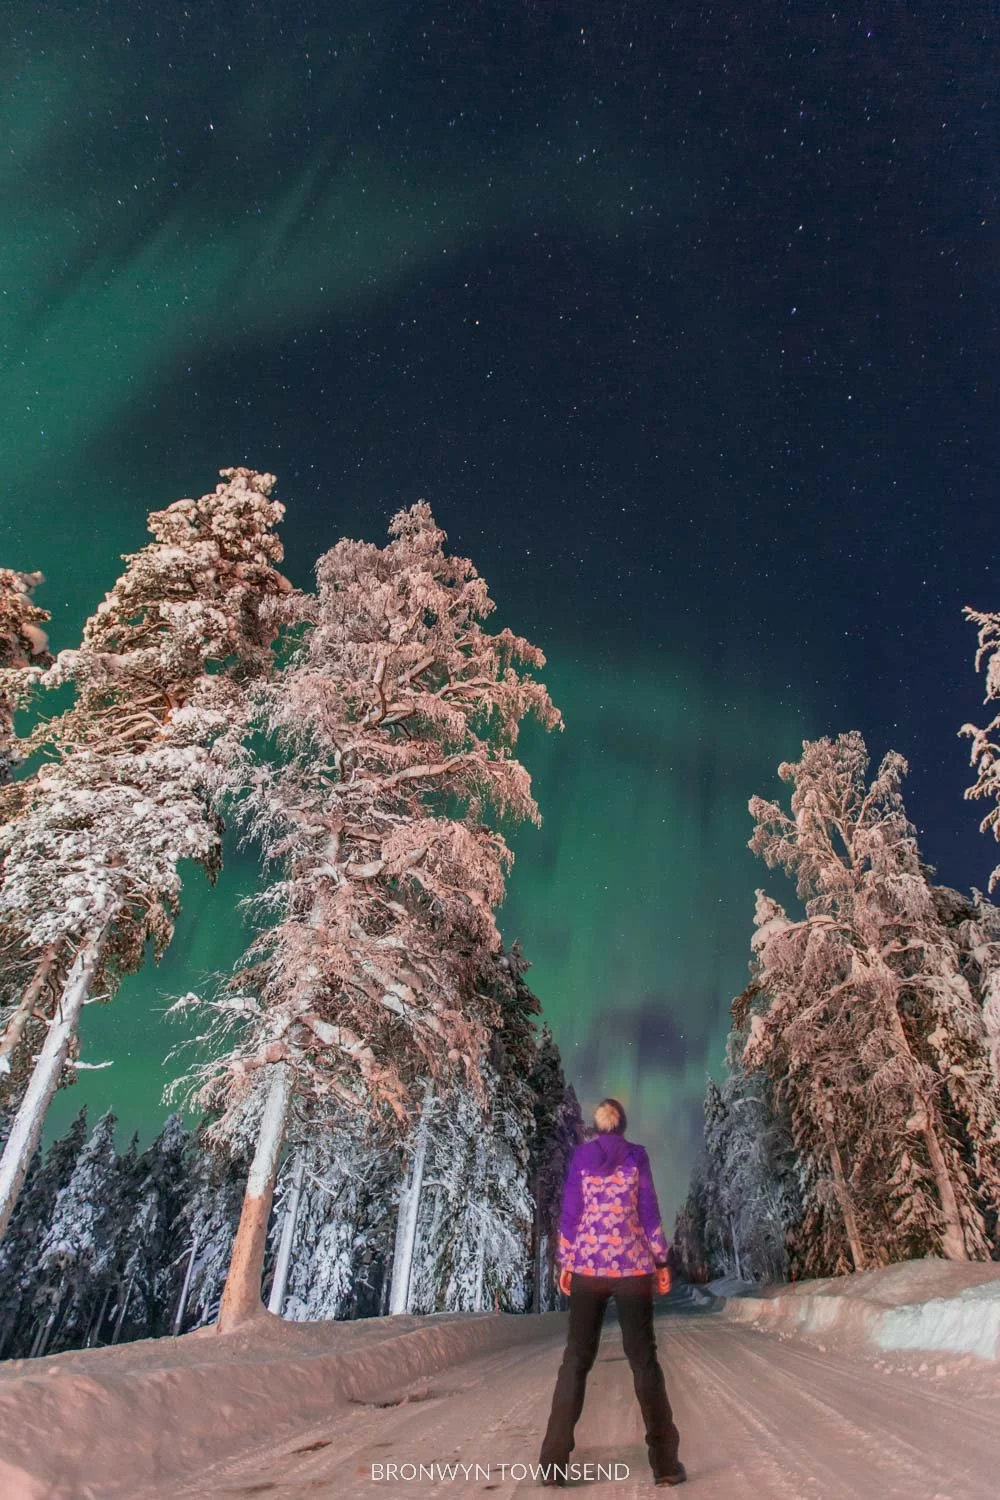
Since that first encounter on an early spring night in March 2017, we’ve also experienced the northern lights in Norway and Finland, where we had the most surreal experience with them yet. Watching ribbons of green tear across the horizon and lights swirl mesmerisingly overhead is truly magic on earth.
Having had my fair share of aurora chasing over the last six or so years, I’ve also been asked by a lot of people how to photograph the northern lights. So, it’s time I shed some light on the equipment and settings you need to know to capture your own magical moments.

Northern lights near Skjervøy, Northern Norway
What are the northern lights?
Often topping many travellers' bucket lists, the northern lights are an atmospheric phenomenon that transforms the night sky into a palette of dancing lights. The northern lights, which are officially called the aurora borealis, are caused by energised particles from the sun crashing into the Earth's upper atmosphere. Reaching top speeds of up to 72 million kph, Earth’s magnetic field protects us humans down below.
This magnetic field redirects those particles back towards the poles, more so the north pole than the south pole, where they slam into atoms and molecules within the Earth’s atmosphere and create ribbons of light that dance across the sky.
What causes the different colours of the northern lights? Different gases react by displaying different colours when they are heated. The northern lights are most commonly seen as green or aqua-toned lights which are caused by oxygen, and purple, blue, or pink lights are caused by nitrogen.
On very rare occasions the northern lights will appear as a red light which is caused by very high altitude oxygen in the atmosphere. You may have also heard of the ‘southern lights’ which is the same phenomenon and known as the aurora australis.

Pine forest near Rovaniemi, Finland

Pine forest near Rovaniemi, Finland
Where can I see the northern lights?
Destinations such as Iceland, Finland, Norway, Greenland, Sweden, Canada, and Alaska are all known aurora borealis hotspots. The best and brightest activity of the northern lights is centralised around the Arctic Circle, which is why the northernmost regions of these countries tend to experience great viewing opportunities throughout the aurora season.
The best northern lights locations I’ve personally visited were Finnish Lapland near Rovaniemi and Tromso in Northern Norway. We also saw them five out of the eight nights we were in Iceland, but they weren’t as powerful as they were in Finland.

Finnish Lapland
Finnish Lapland
Top tips for photographing the northern lights
1. Find a dark place and avoid towns or areas with a lot of light
If you want to capture good photos of the northern lights, reducing light pollution is one of the most important things. Artificial light sources make it considerably more difficult to see them with the human eye and it also impacts your imagery. Even the bright light of a full moon can be too much, so the best time is a clear, dark sky.
2. September - March is the best time to see the northern lights
The time of year varies somewhat due to the location you will be trying to see the aurora borealis, but generally autumn through to early spring is the best time to see the northern lights. The further north you head towards and even into the Arctic Circle, the longer period of time you will have a chance to see them.
3. The Arctic Circle is one of the best places to see the aurora borealis
Due to the magnetic phenomenon that causes the colours we have come to call the northern lights, they are most powerful and visible in and around the Arctic Circle. They can be seen outside of this region though.
4. A DSLR or mirrorless camera with interchangeable lenses and manual mode is best
You want as much control over your camera settings as possible so you can accommodate the specific conditions on that particular day. If you use a DSLR or mirrorless camera you will have more flexibility. I go into more detail about specific camera settings below.
5. Being steady is key
You’ll want to bring a tripod along any time you shoot the northern lights, as long exposures mean camera shake is very real and will have a big impact on the final images you capture. Be sure to pack a tripod.

Near Helgafellssveit in Iceland
What camera equipment do I need to photograph the northern lights?
If you plan on taking photos of the aurora borealis, a camera phone just won’t do this ethereal sight justice. Instead, a DSLR or mirrorless camera is the best way to go. You don’t need to break the budget though - you just need a decent camera with interchangeable lenses and manual mode.
More on the camera settings next, but for now. Here’s a list of my recommended equipment you will need to take great photos of the northern lights.
DSLR or mirrorless camera
I shoot with a Canon R5 and Canon 5D MkIII, but you can choose any similar models from other brands including Nikon, Sony, and Fuji. You also don’t need to buy the most expensive camera. Some other more budget-friendly options include
A wide-angle lens
I choose to shoot with the Canon 16-35L 2.8, but any lens with a wide angle (think somewhere in the range of 10-40mm) with a wide aperture (2.8 is ideal) will be suitable.
A tripod
As you need to use long exposures to capture the northern lights you need to minimise camera shake to snap a crisp image. I love this lightweight travel-friendly Manfrotto tripod as it easily fits into my luggage and doesn’t weigh too much.
Spare batteries
If you’re shooting the northern lights, you’re most likely going to find yourself surrounded by snow and in very cold conditions. Battery lifespan for each charge cycle is shortened when exposed to colder-than-average temperatures. I suggest bringing at least 2-4 spare batteries with you each time and keep them in your pockets/close to your body so they stay warmer. This will help prolong the lifespan of them while you’re out in the elements.
Extra memory cards
If you have a camera that has dual card slots, then definitely fill them both. I also always carry extra memory cards whenever I shoot, as you never know when you will run out of storage or a card might randomly corrupt. It’s always handy to have a backup!
Lightroom or Photoshop
Actually taking the photos is only part of the process, you also need to edit them afterwards to really bring them to life. This is especially true if you shoot in RAW.

Pine forest near Rovaniemi, Finland
What are the best camera settings to photograph the northern lights?
Understanding your camera and the settings you need to use to photograph the northern lights can make or break the results. It’s important to remember that every time you shoot the aurora borealis will involve a little trial and error with your settings. It’s because every experience will be unique depending on any additional light sources, how powerful/strong the aurora activity is on a particular night, and how fast it’s moving.
These are my recommended settings for your northern lights photography.
Manual Mode
For the best results, you want complete control of your camera settings, so set it to manual mode. This means you can apply all of the settings listed below with flexibility.
ISO
ISO is essentially how sensitive the sensor in your camera is to light and it’s one of the most crucial settings when taking photos of the northern lights. An ISO anywhere from 800-3200 is ideal. It will depend on how bright the lights are and the ability your camera has to capture images at a higher ISO.
Most high-end cameras can easily handle using an ISO of 3200, however, older models or low-end cameras may experience higher levels of noise in the final image. This has a grainy look to it and can be unappealing for many people.
Shutter speed
There is no single answer for which shutter speed is best for northern lights photography. The reason is that it will depend on your conditions on the night. If the lights are bright and fast-moving, a faster shutter speed is more likely, while fainter, slower lights will require a longer shutter speed.
Generally, you’ll want to work within the range of 1 to 20 seconds. This will take a few test shots until you get your desired effect. For northern lights that are difficult to see with the naked eye, you will need to increase your shutter speed. I recommend between 5-20 seconds.
If the lights are bright and fast-moving, you’ll want a shorter shutter speed, usually between 1-5 seconds. This will ensure the lights don’t become too blurred with movement and lose their wonderful shape and sharpness in your image.
Aperture
Aperture (also referred to as f-stop) controls how much light reaches the sensor by opening or closing the blades inside the lens more or less. It might seem confusing, but the smaller the number = a larger opening. When photographing the northern lights, you ideally want to aim for an aperture of 2.8 if your lens allows.
If not, choose the widest (smallest number) available with the lens you have. This might be f/3.2 or f/4 on many lenses.

Iceland
White balance
While you can adjust your white balance in post-production, I recommend getting it right in camera instead. For the most natural lighting, I would typically recommend setting your white balance for shooting the northern lights to between 3000-5000 kelvin.
Kelvin is the unit of measurement for colour temperature of light, which you’d typically find runs on a scale from warm (more orange/yellow tones) to cool (blue tones). And, if you don’t feel comfortable trying to set the white balance manually, choose ‘daylight’ from your white balance menu.
Focus
Setting your focus correctly is important to capture a sharp image of the northern lights. Set your lens or camera to manual focus and you can set it to focus on infinity (∞). For the easiest way to do this, get your equipment set up during daylight as it makes it easier to focus.
To do this, set your lens to infinity by adjusting it to have any subject far on the horizon line sharp. If you don’t have the chance to prep your gear earlier or simply forget to, don’t despair, you can still focus at night!
To focus your camera on the northern lights at night, once again turn it to manual and set the focus by aiming it in live mode on a bright light or star far in the distance. Using this as your marker, turn your focal ring on your lens until the subject becomes sharp.
In-camera noise reduction
If your camera has in-camera noise reduction make sure to turn it OFF. It might sound counterintuitive, but this will slow down your camera and you can’t waste time when trying to photograph the aurora. It will also use more of your battery, which already loses juice faster in cold climates.
No flash
I cannot stress this one enough. Do not use a flash for norther lights photography. Not only will your photos not turn out but you’ll also seriously annoy anyone else around you trying to photograph the lights.
Shoot in RAW
Most cameras, especially mirrorless and DSLR models, will allow you to capture images in RAW. This will provide you with far more flexibility when editing your images later and is best-practice for photographers. If you don’t have this option, don’t stress, you can still shoot jpeg too.
BONUS TIP
Many cameras will have a little light on the front of the camera that is used for various reasons like indicating the countdown on self-timer mode or focussing before shooting in low light settings. Cover this with a piece of black gaffa tape to block the light, as it can reflect in your image and cause a red or orange glow, especially if you’re shooting in a snowy setting.

Near Helgafellssveit in Iceland
Photographing the northern lights, especially as a beginner, can be tricky. So don’t feel defeated if you don’t nail it the first time. Like anything, practice will help you improve. The biggest tip I can provide is to get to know your camera before you go.
Have a practice at home somewhere dark with other minimal light sources - even if you don’t have the northern lights where you live! This will just get you feeling more comfortable with your camera and adjusting the settings, especially in the dark.
I hope you’ve enjoyed this northern lights photography guide and let me know in the comments before which other photography tips you’d like to read about.